I have elsewhere discussed the "foundation," the "frame," and the "floppy bits." I've also addressed what that looks like in the first of Fiore's single-hand longsword plays. That looks a lot like the Yagyû approach of trying to find the opening and moving with suddenness, and it starts to address what footwork can do, but it doesn't address why it matters in close contact. For that, let's consider Fiore's crossing at the point.
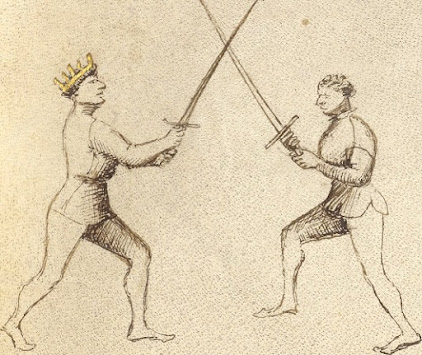
This is the beginning of the zogho largo plays - that is, "broad" plays, which Guy Windsor makes a convincing (to me at least) case isn't a discussion of measure, but rather of how wide-open your options are. At this point, either player has all the options on the table, and can move pretty much wherever they like. Here's what the Fiore play looks like:
Here's the Hatcher translation:
This Master who is crossed at the point of his sword with this player says: “When I am crossed at the points, I quickly switch my sword to the other side, and strike him from that side with a downward blow to his head or his arms. Alternately, I can place a thrust into his face, as the next picture will show.
The Master is the figure with the crown (for further reference, the Scholar has a gold garter, and the Remedy and Counter-Remedy Masters, which crop up less frequently, have golden crowns and garters, with the rule being "more bling, more experience"). From here, it matters less how we got to the crossing at the point than that we are at the crossing at the point. It is worth mentioning also what Fiore has to say about how much leverage you can achieve anywhere along the blade, because that is relevant to why this play works (from Chidester's translation of the Morgan manuscript):
... [C]rossing is of three categories (that is, from the full of the sword to the tip of the sword), and whoever is crossed at the full of the sword can withstand a little, and whoever is crossed at middle of the sword can withstand less, and whoever at the tip of the sword can withstand nothing at all. So the sword, as such, has three matters—that is, a little, less, and nothing.
Thus, the crossing at the tip has minimal leverage for both combatants, but it is easy to slip into the trap that one can exert pressure at this point. So how does this work? Well, having looked at Fiore, lovingly drawn by a talented artist on the cusp of the Italian Renaissance, let's look at another, infinitely superior art form - a half-baked series of line diagrams done in MS Paint.
I've maintained my convention of green for foundation - in this case, strictly foot orientation - red for frame - in this case, the torso in motion - and blue for the floppy bits - in this case, arms and sword. The salient points for why the play works are found in the foundation and the floppy bits this time. They serve to protect the frame from the opponent's sword. How does this work, exactly? Well, let's look at what happens when you change that footwork from a passing step into a Fiore accressere or what we call an "advance."
Short version is that advancing like that without controlling the other blade, or at the very least maintaining blade-on-blade contact, gives your opponent an opportunity to make the red goo appear on the outside of your body. Since everything about Fiore is about keeping the red goo on the inside of your body, and on the outside of theirs, this is important!
Now, there are no fewer than four introductory-level plays in Yagyû shinkage-ryû that are basically the same play, either performed advancing offline and denying them the line, or retreating and beating the sword down and therefore offline, so this is not simply Fiore talking. The only difference is that shinkage emphasizes striking in such a way that blade-on-blade contact is not completely avoided, but it is kept to a relative minimum - Japanese swords are expensive - and emphasizes blade-on-blade contact at the tip, whenever possible - the tsuba is less likely to protect your hands than a European guard, and tip contact gives the greatest chance of rebounding and breaking contact without over-committing.
Here's the thing, though. That play
only works at tip-to-tip contact. If either of them manages to cross at the mid-blade, that creates a leverage situation where whoever got to the mid-blade can control where the other blade goes, and if they
both came to a mid-blade crossing, trying this play is almost guaranteed to result in the other player gaining control of the blade, because slipping under their sword gives them the advantage of gravity (another shinkage-ism - if you
have to cross, better to be on top). There
is a very close cousin of this for mid-blade crossing, which is the very next master in Fiore, but trying
this move from that position is a recipe for disaster. Knowing that this isn't the right move, and to try a different move, is part of the process of learning how to use the sword.
Thus, cultivating a sense of feeling, or touch, or whatever you wish to call it - what the appropriate action in the moment is, in this case how to read pressure, direction, and blade contact - is absolutely essential to the decision-making process of sword combat. That's one of those things of which Musashi would say "this must be practiced diligently."


Comments
Post a Comment